What Happens When Water Damage Is Found Behind Your Siding?
Replacing the siding on your home is one of the most transformative exterior renovations you can undertake. It immediately refreshes your home's color, modernizes curb appeal, and provides reliable insulation. But because siding covers the entire exterior perimeter of your house, it also acts as a curtain concealing what lies beneath.
During a siding tear-off, it is not uncommon for contractors to discover unexpected water damage, rotted exterior sheathing, or failed weather-resistive barriers. If your installation team finds moisture behind your siding, here is what you need to know about how the damage occurred, how reputable contractors fix it, and what steps will keep your home dry for decades to come.

How Does Water Get Behind Siding in the First Place?
A common misconception among homeowners is that siding panels are completely waterproof. In reality, siding acts as a primary weather shield, but wind-driven rain, humidity, and melting snow routinely penetrate exterior joints and gaps. Your home relies on a combination of proper flashings and a weather-resistive barrier (WRB or "house wrap") to direct that moisture harmlessly downward and away.
Water damage behind siding generally stems from a few specific culprits:
- Improper or Missing Flashing: Windows, doors, corner posts, and roof-to-wall intersections require integrated metal flashing (kick-out flashing, drip caps, and Z-flashing). When contractors omit or improperly lap these flashings, water is funneled directly into the wall cavity.
- Deteriorated House Wrap: Aging tar paper or low-grade building wraps degrade over time or tear during original construction, allowing moisture to seep directly into the structural wood.
- Poor Caulking & Maintenance: Cracked or unmaintained sealant joints around exterior spigots, electrical boxes, dryer vents, and window trim allow rain to penetrate behind the panels.
- Direct Ground or Gutter Overflow: Gutters that clog and spill over exterior walls, or siding installed too close to garden mulch and soil, wick moisture upward into the lower wall sheathing.
Signs of Water Damage Before Siding Is Removed

While extensive damage is often hidden until the old panels are detached, subtle warning signs frequently appear beforehand:
- Warping or Buckling Panels: Siding that bows, buckles, or pulls away from the wall often points to expanding, rotted sheathing behind it.
- Peeling Interior Paint or Wallpaper: Water entering through the siding barrier can travel through exterior insulation and show up as bubbling paint or water rings on interior drywall.
- Musty Odors Indoors: Mold or mildew growth inside external wall cavities emits persistent damp odors near perimeter rooms.
- Insect Activity: Carpenter ants and termites are naturally attracted to damp, decaying wood framing.
The Professional Repair Process: Step-by-Step
When moisture is uncovered during a siding replacement, experienced contractors immediately pause the installation to inspect the affected area. Covering wet or decaying wood with brand-new siding invites structural failure, mold growth, and pest infestations.
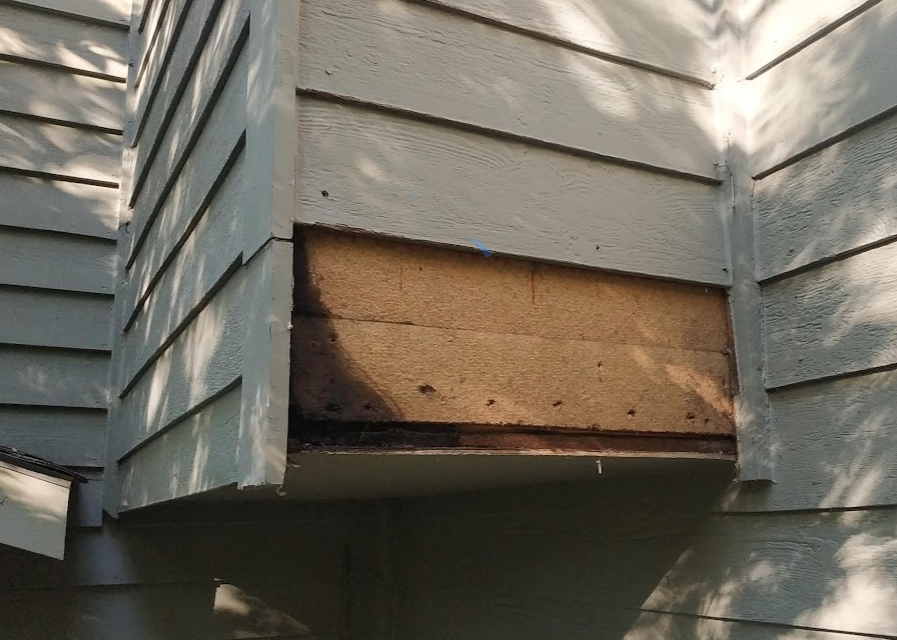
Here is how a certified siding contractor rectifies the issue:
1. Identifying and Documenting the Moisture Source
First, the crew identifies where the water originated—whether from an unsealed window header, roof runoff, or a failed joint. The supervisor takes high-resolution photos of the damaged area so the homeowner has full visibility of the issue before any repairs begin.
2. Stripping and Assessing the Wall Sheathing
The contractor cuts back the damp or decayed exterior sheathing (OSB or plywood) until they reach solid, dry wood. They inspect the underlying 2x4 or 2x6 wall studs, sill plates, and fiberglass insulation to confirm the internal wall framing remains structurally sound.
3. Framing and Sheathing Replacement
If studs or bottom plates have softened, structural reinforcement or replacement framing is installed. New exterior-grade plywood or OSB sheathing is cut and fastened securely to the wall studs, restoring structural rigidity to the wall plane.
4. Installing a High-Performance Weather Barrier
The crew installs an advanced, breathable house wrap (such as James Hardie HardieWrap®) paired with self-adhering flashing tape around all penetrations, window rough openings, and seams. This modern barrier blocks liquid water while allowing indoor vapor to escape, preventing future moisture buildup.
5. Seamless Siding Installation
Once the wall substrate is clean, flat, and fully waterproofed, the new siding—such as durable James Hardie fiber cement or insulated vinyl—is installed according to precise manufacturer specifications.
Estimated Costs to Repair Wood Damage Behind Siding
Similar to roofing, rotten wood repairs cannot be entirely forecasted prior to removing the old siding. Trustworthy contractors provide clear unit costs in their agreements:
- Sheathing Replacement: Usually ranges from $90 to $150 per sheet of plywood or OSB, including labor, disposal, and fasteners.
- Stud or Sill Plate Framing Repairs: Billed by the linear foot or as a transparent change order, depending on structural complexity and access.
- Window/Door Flashing Remediation: Typically adds $75 to $200 per opening if custom metal flashing must be re-bent and integrated with the barrier.
Checklist for Dealing with Siding Moisture

Protect Your Home with Exterior Techs
Discovering water damage behind your siding can be unsettling, but resolving it during an exterior replacement ensures your home's structural integrity remains sound for decades. At Exterior Techs, our certified crews specialize in premium fiber cement and vinyl installations engineered to withstand Virginia's demanding weather. Every project is backed by our 10-Year Workmanship Guarantee, giving you peace of mind that your home is protected from the inside out.
Get A Free Quote!
~2 minute response times.

More Exterior Home Improvement Tips
Written with 20 years of hands on experience in Virginia.


Why Local Homeowners Trust Exterior Techs
From Richmond to NoVa we've got your neighbors protected.